Creating a rin application
Once rust and rin are setup in your computer following the setup guide in the rin site you have a cargo rin extension that allows to create new projects with different features enabled.
First of all in a terminal create a folder somewhere in your computer to store all your rin projects.
Let's start from the most basic application possible.
From the previously created folder type:
cargo rin new basic_example
If you are using visual code you can directly type:
code basic_example
To open the new project. Or just open it from your favorite IDE.
The new project uses the default rin template. In it we can find two files, main.rs which contains the startup functions and we'll ignore by now and app.rs which contains the skeleton of our application:
use rin::gl;
use rin::prelude::*;
use rin::math::*;
use rin::window::Window;
use rin::graphics::arcball_camera;
use mutiny::{
    Scene, SceneBuilder, EventsDispatcher,
    postprocessing::Postprocessing,
    renderer::{ScreenRenderBufferBuilder, ForwardRenderer},
};

pub fn setup(window: Window, gl: gl::Renderer<'static>, events: EventsPoll) -> Scene {
    // Create the scene builder
    let mut scene_builder = SceneBuilder::new(events);

    // Add postprocessing bundle
    let postprocessing = postprocessing::Bundle::new();
    scene_builder.add_bundle(postprocessing);

    // Create a renderer using a render surface
    let renderer = ForwardRendererBuilder::new(gl, window)
        .with_render_surface()
        .samples(8)
        .separate_ambient_buffer()
        .build()
        .unwrap();

    // Create the scene
    let mut scene = scene_builder.with_renderer(renderer).build();

    // Add a camera to the scene
    let events_stream = scene.event_stream();
    let window_size = scene.viewport().size();
    let camera = arcball_camera::Builder::new(events_stream, window_size)
        .position(pnt3(0., 3., 3.))
        .look_at(Pnt3::origin())
        .build()
        .unwrap();
    scene.set_camera(camera);

    // Return the newly created scene
    scene
}
By default we get some basic code that we'll usually use in most projects. It creates a scene with a camera and a renderer, it also adds a postprocessing effects bundle which has most effects disabled but we can customize for our specific project.
Why two renderers?
As you can see in the empty template, the setup function receives a
gl::Rendererthat we then use to create aForwardRenderer. The first is just a little more than a wrapper to OpenGL's functions. TheForwardRendereris a more complex set of systems that render the geometries we add to the scene taking into account lights, cameras or the rin material system.ForwardRenderer's API is independent from any rendering backend although right now rin only supports OpenGL / WebGl.The setup function receives the
gl::Rendererinstead of theForwardRendererdirectly cause the gl renderer can be useful to create some resources that we might need before creating theForwardRendererbut also because we can use other types of render systems than aForwardRendererlike anImmediateRendereror perhaps a custom implementation.
Do we need postprocessing effects on every project?
Not really but rin's PBR material system uses linear colors by default so in order to render them properly we need to convert them back to SRGB which is done by the tone-mapping stage in the postprocessing effects. If you are going to use your own materials or in general materials that use no lighting like BasicMaterial you can probably remove postprocessing completely. Every other effect but tone-mapping comes disabled by default. For more information on postprocessing check the chapter dedicated to it.
To try the newly created project in the terminal we can type:
cargo run
Or use our IDE to run it.
Rin uses a data oriented approach where we add elements to a scene and rin renders them in the most optimal way posible.
To show this let's modify our setup function to add a cube to the scene that will be rendered when we run the application.
Adding geometry
First of all at the beginning of the file let's import the material builder for the StandardMaterial, the default PBR material in rin and for the color constants so we can easily specify the color of our material.
use rin::material::StandardMaterialBuilder;
use rin::color::consts::*;
Then after the code that adds the camera to the scene let's add a new geometry.
scene.set_camera(camera);

// Create a cube geometry and register it in the scene so we can use it later.
// as a return value we get it's entity id
let cube = scene.register_mesh(rin::graphics::cube(1.));

// Create a new material of with a red color
let material = scene.register_material(
    "RedMaterial",
    StandardMaterialBuilder::new().color(RED).build()
);

// Create a model using the previously created material and geometry at the origin
scene.add_model("Cube")
    .geometry(cube)
    .material(material)
    .transformation(pnt3!(0., 0.5, 0.))
    .build();
Two step registering of geometry and materials
You might have noticed that the geometry and the material are not directly added to our model instead we register them with the scene and then add them to the model. This allows to reuse the same geometry or material for more than one model. Rin's renderer can then make optimizations based on that. So if you want to draw more than one model with the same geometry or material remember to reuse them instead of creating new ones every time.
If we run our application now we'll still see nothing. That's because we are still missing a light that lights the scene and allows us to see the cube that we just added. Let's do that.
Adding a ligt to the scene
First of all let's import Node the type used to specify transformations in rin. Again at the beginning of the file:
use rin::graphics::Node
Then, right after the previous code, after adding the cube:
// Create a directional light
let light_lookat = Node::new_look_at(
    pnt3!(3., 3., 3.),
    pnt3!(0.),
    Vec3::y()
).unwrap();
scene.add_directional_light("Sun")
    .transformation(light_lookat)
    .build();
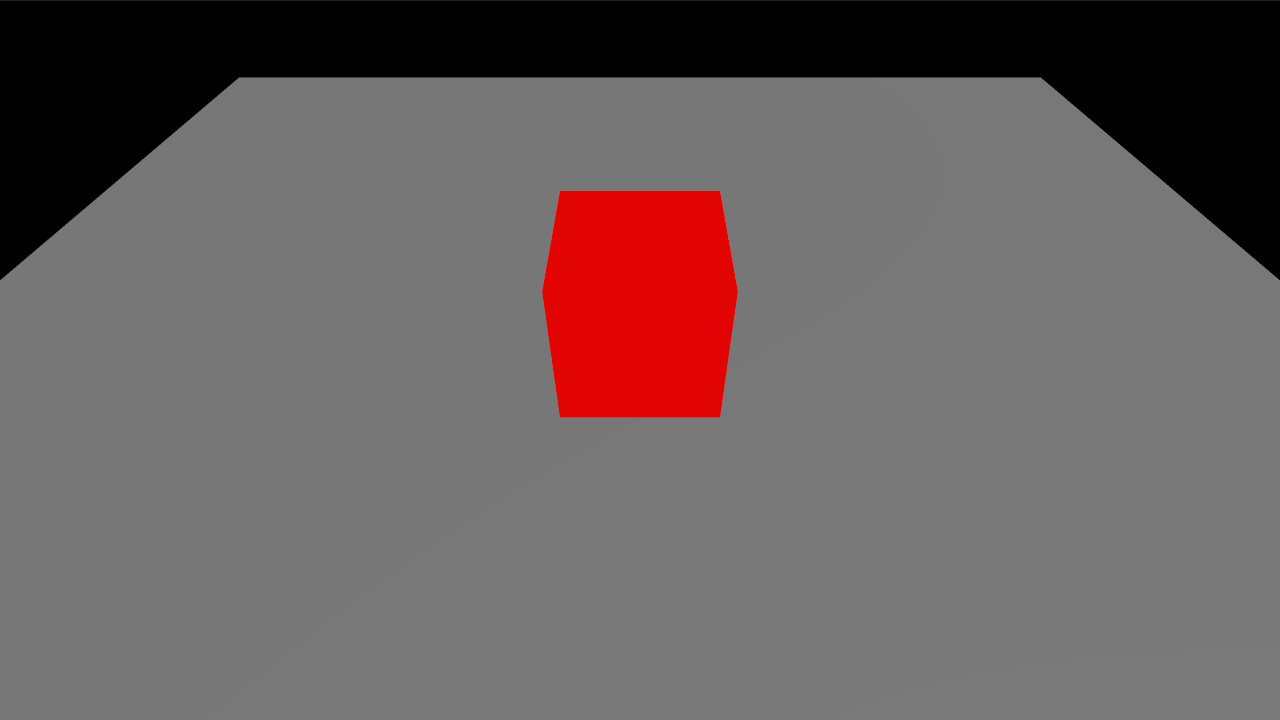
This creates a light at 3,3,3 looking at 0,0,0 with an up vector of positive y. If we run the application now the cube appears in the middle of the screen. The camera that the default template adds by default is an interactive arcball camera that can be moved using the mouse.
Different types in transformation
The transformation methods for the model and the light accept different parameters. In the first case we passed a three dimensional point to specify the origin, for the light we used a
Nodeto specify a more complex transformation that positions the light but also makes it look at a certain point. The transformation method of the different entities that can be added to the scene usually accepts anything that can be converted into a Node, like aPnt3, aTranslation3, aUnitQuat(a quaternion) or aNode.
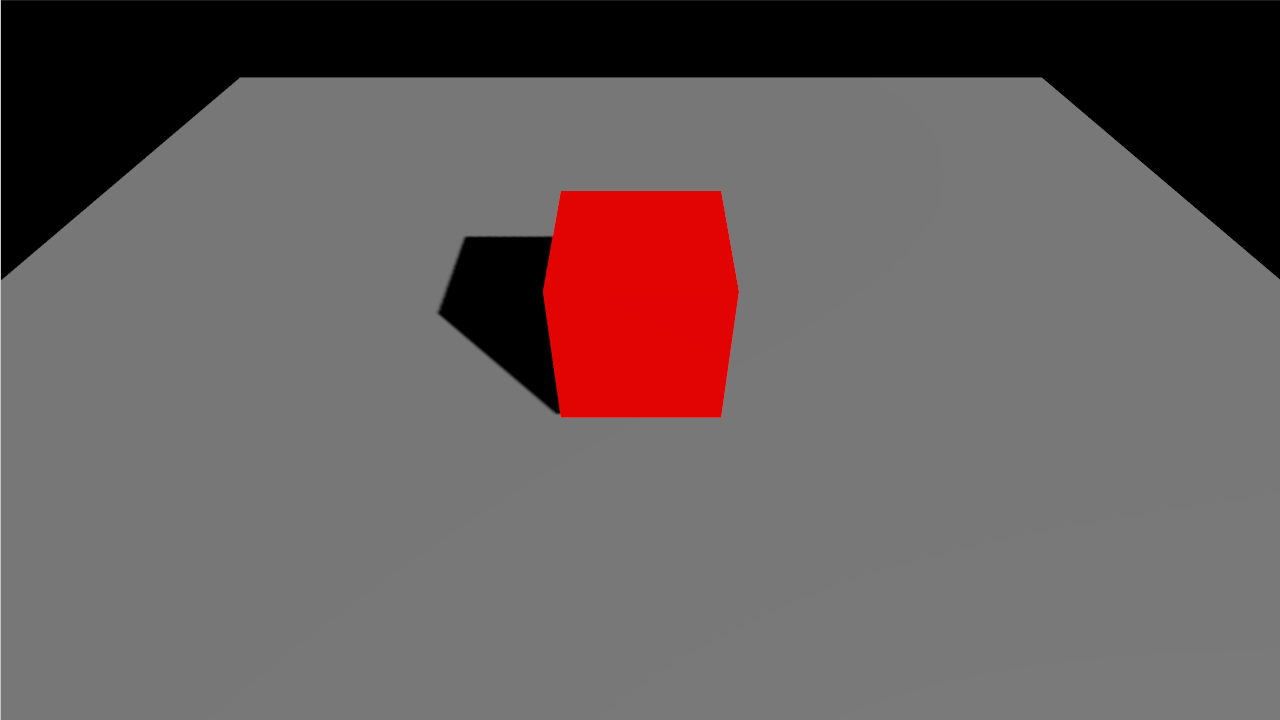
Our cube looks really flat cause our lighting doesn't have shadows yet also there's only a directional light but no ambient light which makes it look completely dark on the sides where there's no light. Let's solve these two issues.
Enabling shadows
Before adding shadows let's add a second geometry for the ground so we can actually see any shadows. After adding the cube lets create a plane for the ground:
// Create a new material of with a gray color
let gray_material = scene.register_material(
    "GrayMaterial",
    StandardMaterialBuilder::default().color(GRAY).build()
);

// Create a model using the previously created material and geometry at the origin
let plane = scene.register_mesh(rin::graphics::plane(vec2!(10.), 1, 1));

// Create a quaternion to rotate the ground plane around it's x axis -90 degrees since it's
// by default oriented towards z
let ground_rotation = UnitQuat::from_axis_angle(
    &Vec3::x_axis(),
    -90f32.to_radians()
);

// Create the ground model
scene.add_model("Ground")
    .geometry(plane)
    .material(gray_material)
    .transformation(ground_rotation)
    .build();
In order to add shadows let's modify the creation of the light and add a shadow map to it:
// Create a directional light
let light_lookat = Node::new_look_at(
    pnt3!(3., 3., 3.),
    pnt3!(0.),
    Vec3::y()
).unwrap();
let shadow_parameters = rin::scene::light::shadow::Parameters{
    map_size: 1024,
    resolution: rin::scene::light::shadow::Resolution::_32,
    left: -4.,
    right: 4.,
    top: 4.,
    bottom: -4.,
    near_clip: 1.,
    far_clip: 10.,
    bias: 0.004,
    depth_clamp: true,
};
scene.add_directional_light("Sun")
    .transformation(light_lookat)
    .shadow_map(shadow_parameters)
    .build();
Entities names
When we create most entities we add a name to them, this allows to easily debug some things when we have complex applications with lots of entities in them since it allows us to see which entity we are debugging, search for them by name or use addons like rin inspector to see all the entities present in the scene with their names
Adding an image based light
In order to make the lighting more appealing a technique that is frequently use is using a HDR environment map to act as lighting so the light is tinted with the colors from the objects in the environment map instead of just having a flat color, this can add more realism to a scene but also can be used for different effects.
Rin provides tools to adapt HDR maps in different formats to the format that it needs to be used in real time. By now let's just download one from the examples repository: https:/rin.rs/examples/envmap.zip. Download it and uncompress it's contents in an assets folder inside the project.
Then we can create an image based light in the scene using this environment map. After the creation of the directional light add:
scene.add_image_based_light("ibl")
    .from_equirectangular("assets/irradiance.hdr", &[
        "assets/radiance_0.hdr",
        "assets/radiance_1.hdr",
        "assets/radiance_2.hdr",
        "assets/radiance_3.hdr",
        "assets/radiance_4.hdr",
        "assets/radiance_5.hdr",
        "assets/radiance_6.hdr",
        "assets/radiance_7.hdr",
        "assets/radiance_8.hdr",
        "assets/radiance_9.hdr",
        "assets/radiance_10.hdr",
    ]).unwrap();
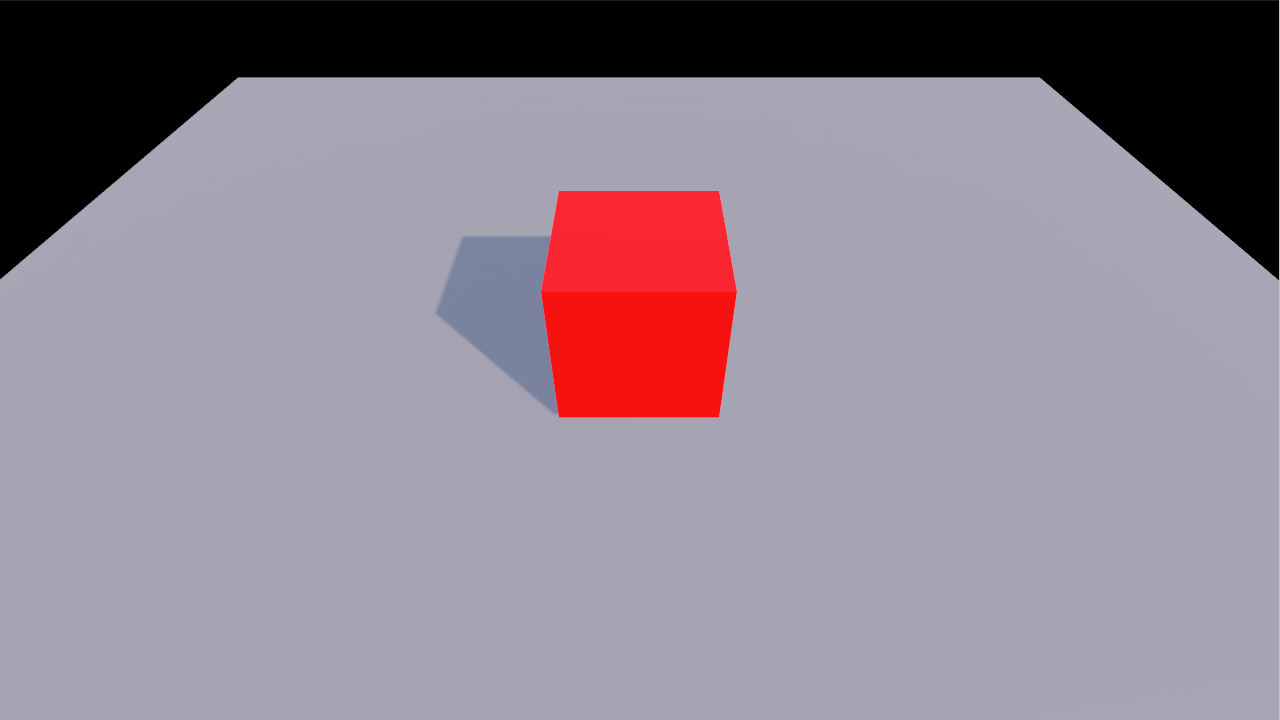
Now the lighting is much softer with the sides of the cube that are not directly facing the directional light also illuminated and the blue from the sky tinting slightly the ground.
Finally, our directional light is created by default with a pure white color which might look strange mixed with the more reddish color of the environment map. To change the color of the light we can add a parameter to the builder calls and pass a color. Although we could just use a color constant or an Rgb value we'll use the blackbody function to calculate the color of the light based on it's color temperature in kelvin degrees. Let's use 3500K which is pretty similar to the lighting in the environment map.
scene.add_directional_light("Sun")
    .transformation(light_lookat)
    .shadow_map(shadow_parameter)
    .color(rin::scene::light::blackbody(3500.))
    .build();
Builder pattern
If you are new to rust you might find strange the pattern rin uses to create the different entities, the camera or the renderer. It's known as builder pattern, it allows to build something that potentially needs lots of options without having to use a constructor method with lots of parameters. Instead we first create a builder, either directly like in the case of the camera with
arcball_camera::Builder::new()or through the scene like in the case of the lights with scene.add_directional_light("Sun"). Those calls return a builder to which we then call chained methods with different options that we want to change from whatever is the default. When we are done configuring we call.build()which will finish creating the object and in the case of builders returned from the scene, add them to the scene.Some builders receive parameters in their construction, like the name for most entities or the gl renderer and the window for the
ForwardRenderer. Those parameters are the minimum, mandatory, ones that the object we are building needs to work.